Receive all updates via Facebook. Just Click the Like Button Below

Powered By | Blog Gadgets Via Blogger Widgets

HomeAboutContact

Monday, October 22, 2012

The Unclipped Linky Party


Tammy at Forever in First has become one of my very favorite go-to blogs because I love how thoughtful she is about how she teaches and treats her students.  She is the teacher I would want for each of my own four, very different, children.  Tammy has again demonstrated her respect for her students with her current post about why she doesn't use behavior charts in her classroom. Tammy says that when she makes classroom decisions (either academic or behavioral) she keeps in mind how she would feel, as an adult, if those decisions were made for her.  What a simple way that is to evaluate our choices...a version of the Golden Rule.  I think that so many of our actions would be better if we routinely asked ourselves "how would I feel if this was done (or said) to me?."  Tammy's post was inspired by a very articulate post by Nikki at Teaching in Progress titled Why I Will Never Use A Behavior Chart Again."  Nikki suggests a "Take a Break" Center where children can go if they need to take a breather or think about making different choices.  This sounds like a wonderful idea.

I wrote a post several months ago about my concerns with Clip Charts and what I had tried in my kindergarten class. You can read that post here. As I describe in that post, I  liked the easy positive  systems created by Angela Watson from The Cornerstone and Sally from Fairy Dust Teaching.
The Cornerstone's Simple Token System
In my preschool class, I have not needed to use any formal system. I address behavior on an individual basis.  If a child is repeatedly having trouble staying in his/her own space during circle time, I will ask him or her to move to a chair until they are ready to come back to the rug.  Similarly, if a child breaks a rule (for example is running in the classroom or throwing toys) my assistant or I will speak with the child. If the behavior continues, the child will be moved to a different activity.

I feel very strongly that one of the most important things I can do as an educator of young children is to make sure that they are excited about going to school and that they feel confident about their ability to learn.  I think that this should be an overarching goal of all primary teachers (perhaps all teachers:)  It has always been my experience that children who want to learn will learn and I fear that any system that relies on publicly degrading (and evaluating) children will interfere with a child's intrinsic excitement about learning.

Friday, October 19, 2012

Pumpkin Paloosa

Pumpkin Week is always a fun way to get ready for Halloween.  We begin by sorting the pumpkins in our classroom.  The kids did a great job thinking of different ways they could classify the pumpkins.

sorting by size
sorting by color
working on sorting by whether the pumpkin is real or not
We also had lots of fun using our play dough to decorate the pumpkins.
These pumpkins have hair.
We created our own pumpkin patch that was inspired by those made by Deep Space Sparkle.
We mixed red and yellow paint to create our orange pumpkins.
Next we used paper scraps to add faces and turn our pumpkins into Jack O Lanterns
I think our pumpkins have such great personalities! 
We loved the poem "This is Jack O'Happy"...this is Jack O'Mad
We used Mrs. Lee's Pumpkin Investigation to answer questions about our pumpkin before we carved it. We were surprised that it floated!


We voted on how we would carve our pumpkin.

We also measure "how many pumpkins tall" we each are.


Wednesday, October 17, 2012

LOTS of Halloween Craft Ideas


We do so many adorable Halloween crafts at our school I decided to put lots of them in one post.  Let me know if you need more details about any of them.

Frankenstein 

Paint tolet paper roll green and black, snip hair end, use green golf tees for bolts, add google eyes and mouth with black marker

The Life Cycle of a Pumpkin

seed is fun foam, sprout is knot in yarn, flower is yellow tissue paper

Giant Pumpkin 


The kids love painting the big pumpkin made by stuffing a paper bag with newspaper.


After the orange paint dries, a face is added with black paint and the stem is painted green.
 Halloween Class Book

Knock, knock, knock
Sounds like more
Trick or Treaters at my door.
I open the door and what do I see?
A __________smiling at me!
The door is stapled on and children draw a picture of  themselves in a Halloween costume,,,I usually draw a square so their picture is not bigger than the space covered by the door.

 Simple Spider Web

A black plastic plate has small slits all around the edge. The children wrap a long piece of white string around the plate and add a spider ring at the end.

Mummies

I love these simple mummies made by wrapping strips of cheese cloth around popsicle sticks.

I have done this at class parties and have the sticks all glued together in advance. The children first color the top portion of the stick green with a marker and then add google eyes.  They then wrap the long strip of cheese cloth around the sticks (I usually glue one end before I give it to the children. 

Spider Web

This is my favorite halloween craft.  It is perfect for class Halloween parties because it can be done in a short time and there is not a long drying time. The web is made with a permanent marker on a triangle shaped piece of plastic (cut overhead projector sheets in half diagonally).  A long piece of black yarn is attached to a hole in the plastic (made with a hole punch)
4 pipe cleaners are cut in half and tied together at the other end of the yarn. The child wraps the yarn around the pipe cleaners (to make the spider body) and then bends down the legs and adds google eyes.  So simple but so effective hanging in the corner of a doorway.

Five Little Pumpkins Sitting on a Fence.


Pumpkin Glyph

Skeleton Made From Paper Plates and brads

Painted Pumpkins

These pumpkins were painted with yellow and red paint. the children then added the details with scraps of black and white paper. These pumpkins were inspired by those described on the Deep Space Sparkle blog.

Ghosts

Ghost Lantern made by folding large piece of white paper in half lengthwise.  Slits added on folded edge.  Paper opened and stapled together to form a cylinder.  Paper eyes and handle added.  Simple and cute blowing in the wind.

Halloween Bulletin Board

Haunted House,
Haunted House,
Scary As Can Be!
How Many 
Spooky Things
Do You See?
Ghosts are made white footprints on black paper with sharpie mouth and eyes. Mummies are made with popsicle sticks and cheese cloth as described above.  Pumpkin are sets of 5 all put next to each other.

Monsters!


Tuesday, October 16, 2012

Boo! Spooky Ghosts


 The director of my Nursery School has always done the most amazing projects with our kids. Every holiday, I still pull out decorations my children made with her (some are over 20 years old!)  Lots of her ideas are found on this blog.  This week I thought I put up some of her Halloween crafts. These ghosts are really easy but SO cute.  Each child is given a meat tray and a big piece of foil that they form into a shape.  The important thing is that the top is rounded.  They then use a second piece to make arms that stick out the side.
Its very easy to work with the foil and it doesn't have to be perfect. The arms are just one crumpled up piece that is pushed into the back of the foil body.
  They are then given a piece of cheese cloth that has been dipped in fabric stiffener.

The kids drape the cheese cloth over the foil.  It looks really good if the material sort of drags off one side.  After the fabric dries (it takes at least a day), the foil is carefully removed (usually by a teacher...just crumple the foil tighter to pull it out) and a permanent marker is used to add a face.  They are really spooky because you can see right through them.
Thanks Joanne!

Monday, October 15, 2012

Simple Monsters


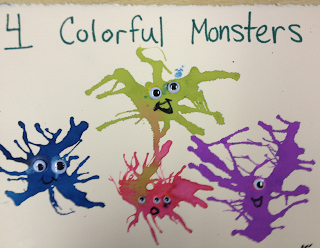
Today we made fun monsters by blowing paint with a straw.    We used liquid water colors but I think that any paint would work well.


When the monsters dried we added mouths with a permanent marker and google eyes (lots of google eyes :).  Simple, but very cute!


Sunday, October 14, 2012

Stone Soup

This week we made stone soup.  Before we made the stone soup we read several versions of the book and acted out the story using a big pot and play vegetables from our kitchen. Unfortunately, my phone was having problems and I lost those photos when I got my new phone (fortunately, I brought my phone into the Apple store just days before the warranty ended...that never happens to me). This is how we made stone soup:
We started by washing our stones very well.

Next we cut up the vegetables that we brought to add to the soup.


While the soup cooked, we went for a walk and found a huge hollow tree trunk that was perfect for making another batch of stone soup.
We came back to our classroom and tried our stone soup.  Initially, several children said they only wanted to smell the stone soup.  Eventually, everyone tried it and decided it was DELICIOUS!